It is that time of year...pumpkin season! I decided to try my hand at a pumpkin ale this year, but where to start. Fortunately for me this month's Zymurgy had a recipe that looked good that I decided to follow. Out of copyright respect for them, I won't publish the recipe right now as it is their current issue. However if they post it later I will put a link up.
What I will say is this recipe called for canned pumpkin, not fresh. Next year I plan to make it out of fresh pumpkin. There is also an addition of pumpkin spice, honey, and maple syrup. The brew day started well enough, but quickly hit a wall. I have heard of how pumpkin can stick a mash, man they weren't kidding! I had already put 1 lb of rice hulls in, so when I stuck I threw another lb in.
Let me try to describe what a stuck mash acts like, and feels like. First, since I use a HERMS system, my mash is always moving. What will happen is that the site gauge will start to go lower and lower. This is because a vacuum effect has started on the bottom of the kettle. Then when I put my paddle in the mash, it was like hitting a rock. I was really surprised at how much this solidified! It took me a few minutes to break it all up, and mix it completely again. Once done, I turned my pump back on and was good to go for a bit. The mash stuck about 3-4 times in the beginning during the protein rest phase and while getting up to 154, but once up to temp it really didn't stick again. I suspect it was two things, first I was mixed more and more of the rice hulls up into the mash, maybe they were not so evenly distributed on first mixes. Second I suspect the warmer temp mash just allows things to expand and the liquid to be more viscus.
After mash I went into mash-out, and hour sparge, then boil. The recipe did not call for much in hops, so the boil was pretty easy. I exceeded my SG a little, the recipe called for 1.070, and I hit 1.072. Color and taste were good of the wort, I am looking forward to seeing how this turns out!

Thursday, October 3, 2013
Monday, September 2, 2013
Batch #27 - Vanilla Cream Ale
After much positive feedback, my last cream ale (Batch #23) seemed to finally hit the mark I was aiming for. Last time I brewed 10 gallons. The first 5 gallons I took one vanilla bean, cut in half, scrapped out insides, chopped up case, then soaked in vodka for a couple of hours. I pitched that into the secondary for 2 weeks.
That batch only ended up having hints of vanilla, they were too subtle. So with the second 5 gallon batch I decided to use two vanilla beans. I had also noticed while tasting the previous 5 gallons at one week the vanilla was stronger than two weeks. This time I did the two beans, and did it for one week. The vanilla flavor was much, much closer to what I was going for. I'm on the fence as to if I hit the exact mark, or if I want to add a little more.
With all that said, everyone basically drank up what I had left so I needed to brew up some more! It is the same recipe as before, didn't change anything. Brew day went pretty smooth, however I took my eyes of the boil kettle for a moment and got a boil over. Other than hurting my pride, and more clean-up, that was the only drama.
What I can update you all on is that I had a lot of transfers to do this weekend too. First off, I took my Oktoberfest out of the carboy, and moved it into a keg. I didn't carbonate it, but I needed to free up the carboy, and I'm simply lagering right now so the keg seemed a good solution. I gave it a quick taste and I think it has some great potential. However my SG reading was a little high, so it isn't as dry as what I was hoping for. I've also now had my Barleywine and Imp Stout on bourbon oak for a month now, so I transferred those to secondaries taking them off the oak. They will now just sit until Mid-Nov. They both tasted great, I am real happy with them. Lastly I transferred the Imp IPA to secondary. It is still bubbling! Tastes pretty good, but it will taste much better once I get the last round of hops on it.
Well that is everything from this week's brew session. Happy brewing!
Monday, August 26, 2013
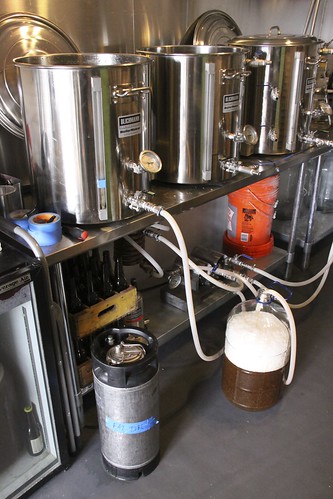
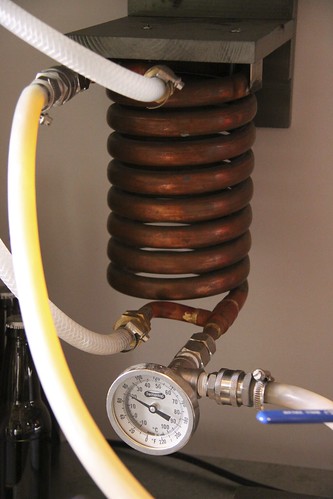
Batch #26 - Bourbon Oak Aged Ale - Photo Edition!
This recipe did not disappoint last time it was brewed. I really hit the oak/whiskey balance with the 4 weeks. That beer was awesome, so really it is just about making more! This time around I made a 10 gallon batch so I would not run out anytime soon.
If you are interested in the recipe, take a look at Batch #20. My only difference is that I brewed double the amounts for 10 gallons.
Since reposting a recipe isn't needed, this time I decided to take pictures along the way. Here's some eye candy.
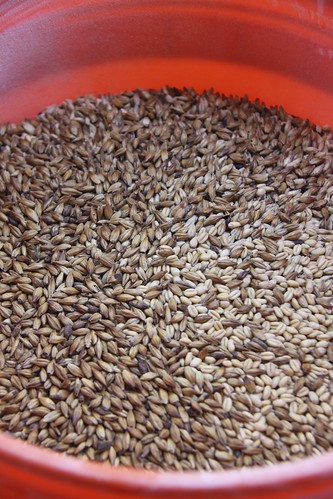
It all starts with the grain!
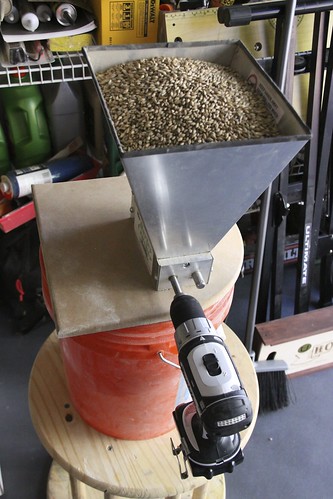
The grain mill for crushing.
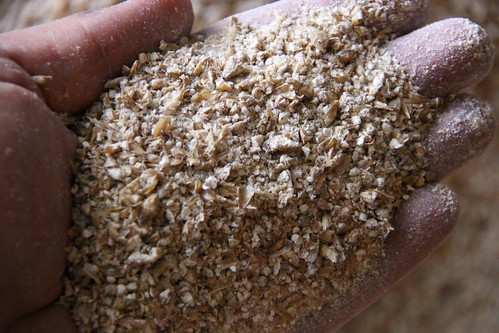
The grain after the crush.
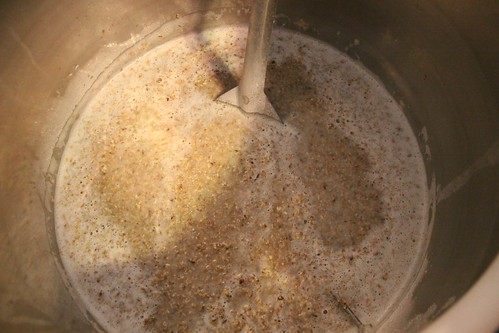
Just starting the mash, stirring in the grains.
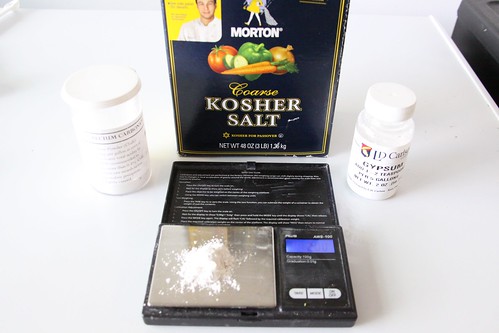
Measuring brewers salts for mash.
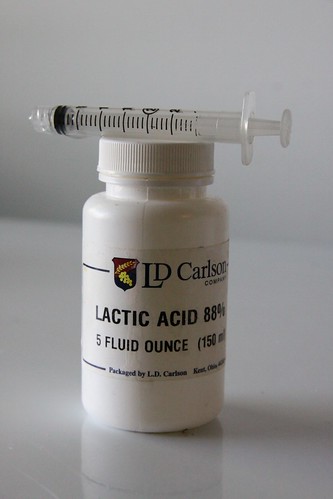
Lactic acid for pH adjustments.
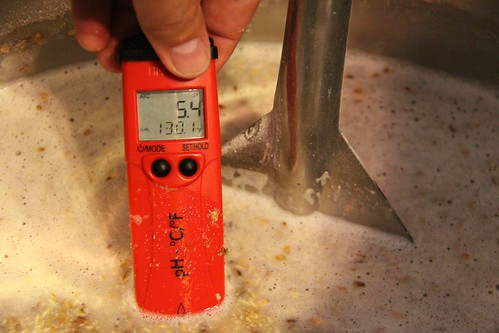
pH reading. 5.4, perfect!
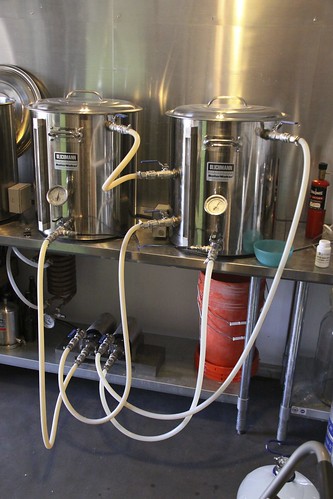
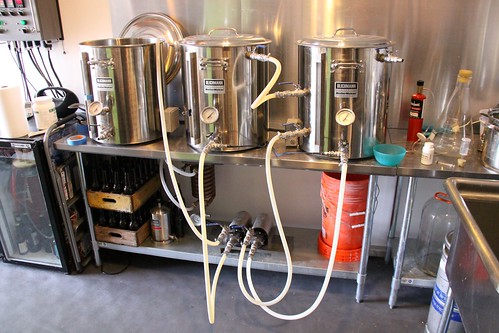
Configuration of hoses for mash.
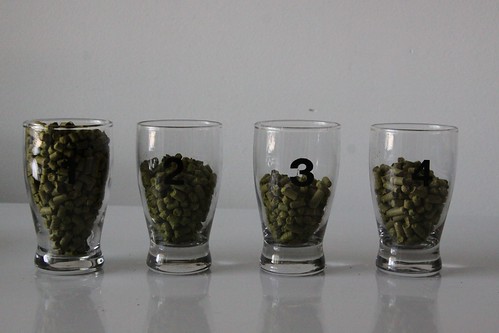
Measuring out the hops for the boil.
Configuration for sparge.
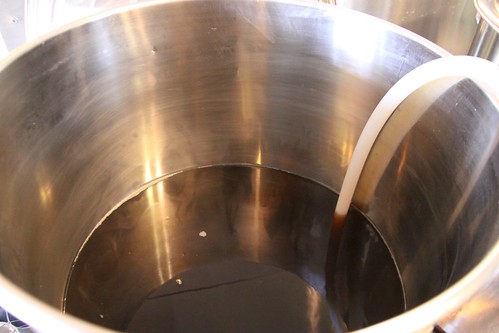
Inside the boil kettle during sparge.
Watching the site glass to make sure I hit my volume needed for boil.
Start of the boil, you can see the heating element outline in the foam.
After the boil chilling down the wort.
A close-up of the wort chiller in action.
That is pretty much the whole brew day, well minus a lot of cleaning. However I figured those pictures would not be as exciting. Just picture every pot shown, carboy, and hose getting a very solid clean. What I did not take any pictures of, which will give me something to do next time, is how I make my yeast starter, fermentation, conditioning, kegging, maybe bottling (don't always bottle), then of course drinking!
Hope you enjoyed the pictures, I'll post more later.
Batch #25 - Unearthly Imperial IPA Clone
It was time, last brew the lager, now an Imperial IPA. I found this recipe in a Clone Brews book I have. In truth I have not had the original brew, but I got it on good authority if going after an Imperial IPA, this would be a good one to go after. I'll get some bottles of it before I drink mine so I can compare.
I am going to do a slight variation in the recipe though. The recipe calls for dry hopping, as do pretty much every single IPA ever brewed. However I am looking for a reason to use my Blichmann HopRocket, so I plan to use it as a Randalizer rather than dry hopping. Will see how well that works out. I picked up the fittings I would need on my last trip to my LHBS, and only need to get my hop leaves ordered (can't use pellets in this).
Here is the recipe:
Batch Size - 5 gallons
Grains18 lbs 4 oz - UK 2-Row Pale Malt
8 oz - Torrified Wheat
4 oz - Crystal Malt 10L
4 oz - Caramunich Malt
Additions
1 lbs - Cane Sugar
Hops
2.6 oz - Chinook (13%) (90 min)
1.43 oz - Cascade (5.5%) (15 min)
0.36 oz - Cascade (5.5%) (5 min)
0.36 oz - Centennial (10%) (5 min)
0.36 oz - Chinook (13%) (5 min)
1.43 oz - Fuggles (5.4%) (1 min)
0.5 oz - Cascade (5.5%) (dry hop)
0.5 oz - Centennial (10%) (dry hop)
0.5 oz - Chinook (13%) (dry hop)
Yeast
Wyeast 1056 - American Ale
Brewers Salts
2 g Chalk
2 g Calcium Chloride
2 g NaCl
The brew schedule was as follows:
Mash
1.25 q water/lb
60 min at 151 degrees
Mashout to 170 degrees for 10 min
Sparge for approx 1 hour
Boil
90 min boil
Full 90 min add first Chinook hops
Final 15 min - Add Cascade as outlined above, add whirfloc tablets
Final 5 min - Add Cascade, Chinook, and Centennial as outlined above
Final 1 min - Add Fuggles
Fermentation
Primary - 14 Days @ 64Secondary - 14 Days @ 72
Keg Condition - 14 Days
Here are the specs on this brew:IBU's -100 IBUsColor - 7.5 SRMCalories - 315 per 12 ozEstimated OG - 1.097Actual OG - 1.092Estimated FG - 1.010Estimated ABV - 10.9%
This one has been slow to ferment. I did a large starter given the hi OG, however it is still bubbling away. After two weeks in the fermentation chamber, where after one week I bumped up the temp to 70 degrees, it was not fully completed. I have now placed the carboy in my basement which is a little warmer in the lower 70's, and after a week there is still some bubbling activities. This weekend I will take another gravity reading. At the time of the move gravity was down to 1.015, so it showed a little more to go.
I have some more research to do on how much conditioning I should do. On one hand you should condition higher gravity beers for a long time to really smooth out. However with IPA's, you lose a lot of hop flavor the longer you let it sit. I suspect somewhere in between is a sweet spot, the trick is to find it!
Sunday, July 21, 2013
Batch #24 - Oktoberfest
It is time I finally did a lager on this system! I can't think of a better style than getting an Oktoberfest started. Timing right now should be good as it will be ready towards the end of Sept. I got the recipe from a clone brew recipe book I have. It is a clone recipe of an Oktoberfest called Ayinger Oktober Fest-Marzen from Privatbrauerei Aying, Aying, Germany. I have not had this beer myself, but that is part of the fun! It is seasonal so it should be out in the fall when mine is ready. It will be fun to get some bottles of it and compare it to my brew.
Here is the recipe:
Batch Size - 5 gallons
Grains
7 lbs 12oz - German Pilsner
3 lbs - Munich Malt
8 oz - Dark Munich Malt
8 oz - Caramunich Malt
Hops
1.03 oz - Tettnang (6.5%) (90 min)
0.5 oz - Hallertauer Hersbrucker (2%) (15 min)
Yeast
Wyeast 2308 - Munich Lager - Target 440 billion
cells
Brewers Salts
2.3g Chalk
0.7g Baking Soda
The brew schedule was as follows:
Mash
Mash
1.25 q water/lb
90 min at 153 degrees
Mashout to 170 degrees for 10 min
Sparge for approx 1 hour
Boil
90 min at 153 degrees
Mashout to 170 degrees for 10 min
Sparge for approx 1 hour
Boil
90
min boil
Full 90 min add Tettnang hops
Final 15 min - Add Hallertauer Hersbrucker and Whirfloc tablet
Fermentation
Primary - 14 Days @ 50Final 15 min - Add Hallertauer Hersbrucker and Whirfloc tablet
Fermentation
Secondary - 7 Days @ 55
Secondary - 30 Days slowly decreasing temp to 34
Secondary - 3 Days @ 60 degrees
Keg Condition - 14 Days
Here are the specs on this brew:
IBU's -23.3
Color - 8.0 SRM
Calories - 182 per 12 oz
Estimated OG - 1.056
Actual OG - 1.055
Estimated FG - 1.013
Estimated ABV - 5.7%
The fun and different thing I did on this one was rather than using my usual water profile and brewers salts, I added chalk and baking soda to get as close to a Munich water profile as possible. I am really looking forward to seeing how this turns out. Unfortunately it will suck up one of my fridges for a while to lager, but it will be worth it!
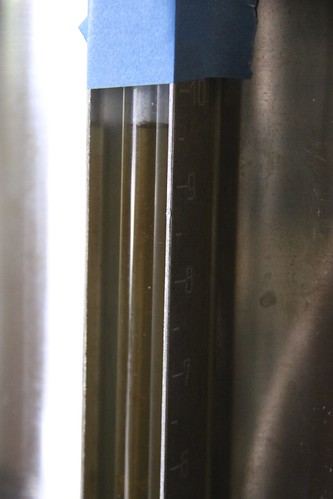
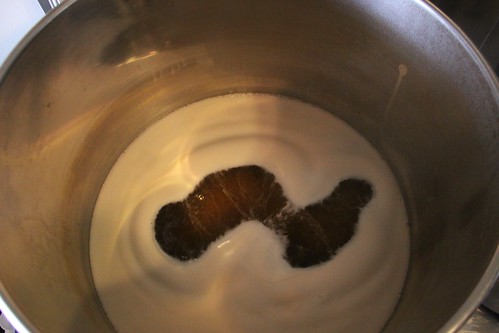
The brew day went really well and smooth. The only thing I didn't hit on the mark is I lowered my boil just a little, and as a result I didn't evaporate at the same rate, so with that my finishing hops ended up being on a little longer. Outside of that things went great. Below is a photo from the refractometer of my OG.

Batch #23 - Cream Ale
The award winning Cream Ale had to be brewed again! This time I bumped it up to a 10 gallon batch. Other than increasing the ingredients, the recipe followed was Batch #14. I plan to play with this a little though this time. I of course split this up into two 5-gallon carboys to ferment. The tricky thing here with yeast starters is how to evenly split the yeast between the two carboys. I don't have a great technique right now other than eying it, but I will figure out a good solution soon. To try and compensate for any variations between the two carboys, I blended the batches when I transferred to secondary.
At this stage the Cream Ale is in its secondary fermenters. One fermenter I will keep the original recipe, the other I added something a little special which I can't wait to try. I got a nice vanilla bean, split it in two, scrapped it out the inside, and chopped up the skin. I then take all of that and drown it in a little bit of vodka to kill anything so I don't contaminate the beer. After letting it soak for a few hours in the vodka I then dump it all into the secondary. Since vodka is already pretty flavor neutral, it works out well, plus it is a very small amount. I will then taste this regularly until I feel I've achieved enough of the vanilla flavor I am looking for.
This vanilla cream ale has a special place in my heart going back to my days living in Nashville. This was right around the time I turned 21 which was great too. There was a brewery down there called Market Street on 2nd Ave. They had this great vanilla cream ale that I could not get enough of. This beer lives only as a memory in my mind because it is no longer made. The brewery/pub closed down a few years ago. Fortunately I think I had enough of it back then to lock that flavor in! Ideally the vanilla bean will do the trick, I would like to not use extract, but my gut is telling me to get the strong vanilla flavor they used to get, and because they did this on such a large scale, using extract was probably easier for Market Street. Will see though if I can achieve the flavor profile with the vanilla beans.
Batch #22 - Bourbon Barleywine
I could not get enough of this delicious beer last time around. It is so full of flavor, and of course it is oaked with a bourbon (Woodford Reserve) oak spiral (American oak medium char) which makes it all taste so very good! This time around I am going to only oak it for 4 weeks. In recent tastings of the Bourbon Ale (Batch #20), 4 weeks was perfect. No heavy oak or tannin flavors, but the bourbon and vanilla from the oak comes through. I'm hoping to really let this age for a while too so it can mature. I couldn't resist last time and drank it pretty soon, but could taste it evolving over time. This time I will be more patient, and it should prove an awesome Fall brew.
I followed the recipe and process exactly as before in Batch #18. Feel free to review that posting for the recipe. The only difference this time is I was able to hit a higher OG at 1.099. I believe I achieved the higher OG simply because I boiled it down a little further, as well as a more controlled sparge technique I've been doing lately. As I write this I brewed this 4 weeks ago and will be transferring it into secondary tomorrow so I can put on the oak. Then 4 weeks later I will keg and let time do its thing.
I followed the recipe and process exactly as before in Batch #18. Feel free to review that posting for the recipe. The only difference this time is I was able to hit a higher OG at 1.099. I believe I achieved the higher OG simply because I boiled it down a little further, as well as a more controlled sparge technique I've been doing lately. As I write this I brewed this 4 weeks ago and will be transferring it into secondary tomorrow so I can put on the oak. Then 4 weeks later I will keg and let time do its thing.
Friday, July 12, 2013
Batch #21 - Firecracker Ale
Nothing like a good Firecracker Ale to ring in the 4th of July! I brewed this batch last year as an extract brew before I had the all-grain setup up and going. It was an interesting beer that is a good easy drink on a hot summer day. The interesting part of this brew is the kicker added to it during the boil.

That's right, Red Hots! It gives the beer a reddish hue and a little subtle zip. This year I converted that recipe to all-grain. Here is that recipe:
Batch Size - 5 gallons
Grains
10 lbs - Pale 2-Row
1 lbs 8 oz - Crystal 20L
12 oz - Torrified Wheat
4 oz -Flaked Barley
Color and Flavor
1 lbs - Red Hots Candy
Color and Flavor
1 lbs - Red Hots Candy
Hops
1.2 oz - Centennial (60 min)
1.73 oz - Liberty (20 min)
Yeast
Wyeast 1056 - American Ale - Target 625 billion
cells
The brew schedule was as follows:
Mash
The brew schedule was as follows:
Mash
1.25 q water/lb
75 min at 150 degrees
Mashout to 170 degrees for 10 min
Sparge for approx 1 hour
Boil
75 min at 150 degrees
Mashout to 170 degrees for 10 min
Sparge for approx 1 hour
Boil
60
min boil
Final 60 min - Add Centennial and Red Hots
Final 20 min - Add Liberty
Final 15 min - Add Whirfloc
Fermentation
Final 60 min - Add Centennial and Red Hots
Final 20 min - Add Liberty
Final 15 min - Add Whirfloc
Fermentation
Primary - 14 Days @ 64
Keg Condition - 14 Days
Here are the specs on this brew:
IBU's -47.6
Color - 5.9 SRM
Calories - 195 per 12 oz
Estimated OG - 1.059
Actual OG - 1.056
Estimated FG - 1.012
Actual FG - 1.010
Estimated ABV - 6.2%
Actual ABV - 6.0%
We drank this over the 4th of July weekend and it was a hit! We didn't drink the whole keg as the crown was not huge, but that is fine as it will give me some left that I can bottle and hang onto.
Tuesday, July 9, 2013
Batch #20 - Bourbon Ale
Ahhh, I do love the flavor of this beer. It is inspired by the Kentucky Bourbon Barrel Ale. I have brewed this in the past (Batch #7). When I brewed #7 I took a 10-gallon batch and split it into two 5-gallon batches, then experimented with oaking the beer different lengths. One batch I did for 30 days, the other for 60. There was considerably more vanilla and whiskey flavor in the 30 day than the 60 day. The 60 day the flavors were more subtle and there was more straight oak and tannin flavors. With that knowledge in hand, I am doing this one for 30 days.
The recipe is based on an Irish Red Ale recipe, and this time had some small variances from the last. Also this time I only brewed a 5-gallon batch. Here is the recipe:
12 lbs - US 2-Row
1.23 lbs - Crystal Malt 40L
1.23 lbs - Briess Carapils
14.8 Oz- White Wheat Malt
Mash was a 90 minute mash at 150 degrees with 21.27 quarts of water. We mashed out at 170 degrees and Sparged for 60 minutes.
Hops
0.53 Oz- Goldings, East Kent - 90 minutes
0.54 Oz - Fuggles - 45 Min
0.27 Oz - Fuggles - 15 Min
1 each - Whirfloc Tablets 15 Min
Boil was for 90 minutes.
Yeast
Wyeast 0007 - Dry English Ale
Fermentation at 64 degrees for 2 weeks. Then racked to secondary, moved to 70 degree environment and pitched the oak.
This time around I have been keeping American Oak Medium Charred spirals on Woodford Reserve for months, so I only needed to pitch one of the spirals.
I left the oak on for 30 days, then kegged. So far I have had this in the keg for about a week and only took a brief sample and boy were the flavors great. I am going to let that condition for a few more weeks then go ahead and start drinking it for real.
In general this brew I did not hit my numbers or my efficiency. I'm not sure why, but not too worried based on what I've tasted so far. Learning something new each day...
Tuesday, July 2, 2013
A Little Behind
Well mine is not so little, but I am behind in my posts! Due to some life events I have recently slowed in my brewing, and for certain my posts, however it is picking back up now. I am taking this opportunity to post a quick update.
First let me tackle brewing. I have brewed two batches since the last post. One batch was my Bourbon Aged Ale which I just recently kegged, and the other the Firecracker Ale for the 4th of July. I will post some reviews and pictures on these later along with the recipes.
Now I can announce the fun news. I placed Best in Show at the Kohler Festival of Beer in their Homebrew competition!

It was Batch# 14 that won, and the recipe and brew day was logged here:
http://relativitybrewery.blogspot.com/2013/02/batch-14-american-cream-ale.html
What also scored very well was Batch# 15 the Scotch Ale. The BJCP judges gave that a 44! Here is that recipe and brew day:
http://relativitybrewery.blogspot.com/2013/02/batch-15-scottish-strong-ale.html
All great news and very encouraging. I look forward to entering more competitions!
The next few weeks will be packed with some good brewing. I want to redo both Batch #14 and #15 again since they scored so well. This time for Batch #14 I will make a 10 gallon batch, and split up the fermentation into two 5-gallon batches. I will then take one of those and play with adding vanilla. I have always loved a good vanilla cream ale, so this sounds like fun.
I also have on the horizon an Imperial IPA, and an Oktoberfest. Going into July I need to get that Oktoberfest started so it will be ready in time (probably should have started even sooner).
I brewed over this last weekend my Barley Wine, so I will post those details shortly. More to come...
First let me tackle brewing. I have brewed two batches since the last post. One batch was my Bourbon Aged Ale which I just recently kegged, and the other the Firecracker Ale for the 4th of July. I will post some reviews and pictures on these later along with the recipes.
Now I can announce the fun news. I placed Best in Show at the Kohler Festival of Beer in their Homebrew competition!
It was Batch# 14 that won, and the recipe and brew day was logged here:
http://relativitybrewery.blogspot.com/2013/02/batch-14-american-cream-ale.html
What also scored very well was Batch# 15 the Scotch Ale. The BJCP judges gave that a 44! Here is that recipe and brew day:
http://relativitybrewery.blogspot.com/2013/02/batch-15-scottish-strong-ale.html
All great news and very encouraging. I look forward to entering more competitions!
The next few weeks will be packed with some good brewing. I want to redo both Batch #14 and #15 again since they scored so well. This time for Batch #14 I will make a 10 gallon batch, and split up the fermentation into two 5-gallon batches. I will then take one of those and play with adding vanilla. I have always loved a good vanilla cream ale, so this sounds like fun.
I also have on the horizon an Imperial IPA, and an Oktoberfest. Going into July I need to get that Oktoberfest started so it will be ready in time (probably should have started even sooner).
I brewed over this last weekend my Barley Wine, so I will post those details shortly. More to come...
Sunday, March 24, 2013
Batch #19 - IC 5150 Ale
This week's brew is a tribute to a famous craft ale brewed out of Colorado. The hint of that brew is in this title. Here is a pic of the nebula IC 5150.

This week's brew session went fantastic. I feel I have my software dialed in now as I hit all my marks. This is a lower gravity beer as well, so that probably helped. Here is the recipe:
This week's brew session went fantastic. I feel I have my software dialed in now as I hit all my marks. This is a lower gravity beer as well, so that probably helped. Here is the recipe:
Batch Size - 5 gallons
Grains
9 lbs 14.1oz - 2-Row Belgian
1 lbs 3.8 oz - Special B Malt
9.9 oz - Munich Malt
9.9 oz - Crystal 120L
Hops
0.52 oz - Brewer's Gold 10.4 alpha (90 min)
1.41 oz - Saaz 3.1 alpha (45 min)
Yeast
Wyeast 1762 - Belgian Abbey II - Target 223 billion
cells
The brew schedule was as follows:
Mash
1.25 q water/lb
90 min at 152 degrees
Mashout to 170 degrees for 10 min
Sparge for approx 1 hour
Boil
90 min boil
Start -
Add Brewer's Gold
45 min - Add Saaz
Final 10 min - Add Whirfloc
Fermentation
Primary - 14 Days @ 65
Secondary - 21 Days @ 55
Keg Condition - 21 Days @ 60
Here are the specs on this brew:
IBU's -
Color - 20.5 SRM
Calories - 193 per 12 oz
Estimated OG - 1.058
Actual OG - 1.059
Estimated FG - 1.013
Estimated ABV - 5.9%
New Estimated ABV from OG - 6.0%
I hit all my numbers on this brew which felt real good. The only part that didn't go complete to plan is factoring in how much wort evaporates getting the brew pot up to a boil. I need to figure that part out and include it into my software. The reason for it being an issue is it reduced the amount of time the starter hops were on.
The next time I brew I also am going to pay close attention to getting gravity readings right at flameout, and then in fermentor. I sort of tried to do so this time, but got caught up in activities. I took a reading at flameout and was at around 15 brix which is where I wanted to be. I later took a reading from some of the wort going into fermenter and it was a higher reading, too high. I then waiting until the entire wort transferred into carboy and took a gravity reading with my hydrometer which was in line with what I was looking for. Lesson is next time I am going to really focus on these readings and understand how (if at all) gravity readings change from taking a reading in boil kettle at flameout vs. final chilled wort in carboy.
I am lining up some cool spring/summer brews to get going over the next few weeks. Getting ready for these cold temps to break!
Thursday, March 21, 2013
Batch #18 - Bode's Bourbon Barleywine
I have taken on the name Bode's Bourbon Barleywine for this brew. Am trying to finally tie some astronomy into my beer names. For those interested, Bode's full name is Johann Elert Bode. He is credited with finding Bode's Galaxy (M81), as well as having a hand in naming Uranus (hehe). Below is Bode's Galaxy.

After trying a big Imperial Stout a couple of weeks ago (which is still fermenting), I decided to take on another big beer with a Barleywine. Here is the recipe I used:
After trying a big Imperial Stout a couple of weeks ago (which is still fermenting), I decided to take on another big beer with a Barleywine. Here is the recipe I used:
Batch Size - 5 gallons
Grains
16 lbs 13oz - Pale 2-Row
1 lbs 3.9 oz - White Wheat
1 lbs 2.3 oz - Cara Belgian
15.3 oz - Caramalt
9.2 oz - Munich Malt
9.2 oz - Caramunich Malt
Hops
5.35 oz - Fuggle (60 min)
1.61 oz - US Goldings (10 min)
Yeast
Wyeast 1056 - American Ale - Target 625 billion
cells
The brew schedule was as follows:
Mash
1.25 q water/lb
90 min at 158 degrees
Mashout to 170 degrees for 10 min
Sparge for approx 1 hour
Boil
150 min boil
Final 60 min - Add Fuggles
Final 10 min - Add Whirfloc and US Goldings
Fermentation
Primary - 14 Days @ 65
Secondary - 30 Days @ 70 on Bourbon Soaked Medium Char American Oak
Keg Condition - 30 Days
Here are the specs on this brew:
IBU's - 66.4
Color - 10.5 SRM
Calories - 357 per 12 oz
Estimated OG - 1.101
Actual OG - 1.093
Estimated FG - 1.029
Estimated ABV - 9.6%
New Estimated ABV from OG - 8.5%
A few notes on this brew. First, I have learned for reasons I am still learning (if that makes sense) that when brewing a high gravity beer it is easy to have a lower efficiency than normal. This proved to be true for this brew as I fell a little under my mark. After brewing I watched this video which gave me some ideas for next time:
Another part of this process which I'm dialing in is my BeerSmith2 software setup. There are many dynamics to this software that take time to learn. Not only learning about the software, but learning about details of your beer equipment and process. Going into this brew I felt I had things dialed in pretty well, however my results were not completely what I was expecting. What I'm also learning is that I can take a gravity reading at the end of my boil to see if I'm where I should be. If too low then I simply need to boil more.
More on the idea of boiling more. This is a bit trickier than it sounds because you add your hops at specific times. With that said I have been using the following calculator at Brewer's Friend:
http://www.brewersfriend.com/dilution-and-boiloff-gravity-calculator/
There is also a tool in the BeerSmith software to help with this too. Using a tool like this will help determine how much more you need to boil off before you hit your gravity. Knowing how much you need to boil off, and the rate your system boils off wort, you can determine the amount of time it takes. For example I use 1.8 gallons per hour of boil off, so if the software tells me I have 1.8 gallons left to go, then I know I have 1 hour left.
As you can see there are some moving parts here. Ideally you hit your pre-boil gravities so you don't have to modify along the way and you end up with the exact volume you are hoping. However you have to be flexible to hit your numbers. Remember the bitterness of hops are balanced by the sweetness of the beer, so if you get either too out of balance you may not like the results.
So far the fermentation is going well. I made a huge starter and pitched it a couple of days after the brew. I of course wanted to pitch it on brew day but the starter being so big took a big longer than expected. If you are solid in your cleaning and sanitizing, then there should be no issues with simply holding the wort ready to ferment in a closed container (in theory, though adds risk).
What I learned from last time is to aerate the wort well. Immediately after pitching the yeast I ran oxygen for as long as I could before it started to foam over. I let it settle a couple of hours, then did it again. I let that settle a couple of hours, then did it again.
If you watch the above video John Palmer discusses that really what would be better is to pitch the yeast at high krausen. This is something I am going to read and learn more about. Previously I've been allowing the starter to complete, then settle, then decant off the top beer leaving the slurry. I then swish the slurry around to stir it all up and pitch. There seems to be debate online regarding pitching the spent beer which is why I decant it off. However in order to pitch high krausen you have to pitch the fermented beer too. More reading to come...
This weekend I am going to go simpler and brew a Fat Tire Clone.
Wednesday, March 13, 2013
A Lesson on Efficiency
An area that has perplexed me a bit in brewing is the term "efficiency". I have heard some people throwing out numbers like 70%, or 80%, even as high as 95%! I built an Electric Brewery system where the designer claimed to be getting very high efficiencies, in the 95% area. I figured as I have the same equipment, any deviation from that would be surrounding my techniques.
One of the other great mysteries to me about efficiency is what my software was telling me. My iPad software iBrewmaster asks you to enter your system's efficiency, then when the brew day is over and actual numbers are in, it calculates the actual efficiency. I was doing great to hit 85%, pretty far off the 95%.
Then I started to use Beersmith2, and wait a minute, what is this "mash efficiency" it is talking about? A picture is starting to form here, that maybe there are multiple measure points of efficiency. By chance a great thread started on the Electric Brewery forums which discussed exactly this topic. Turns out other people were wondering the same, and out of this some clarity surfaced. You'll have to look past some of the frustrated posts made at one point, but after that some of the real figuring out of the calculations take place.
http://www.theelectricbrewery.com/forum/viewtopic.php?t=26250
Posted within this thread is a great article from Brewer's Friend:
http://www.brewersfriend.com/2012/11/30/making-sense-of-efficiency-definitions/
After reading through these, some things started making more sense. Back around Batch #9 I started making only 5 gallons batches. Making 10 gallons each time was leaving a lot of experimental brew left over at times, so while experimenting doing 5 gallon batches made more sense. If you notice in Batch #9 I started hitting bad gravity numbers. I went through everything thinking I was making mistakes in process, I even found out that the Cargill grains I switched to had a lower diastic power, however with these reads the clarity finally hit.
Going to 5 gallon batches changed my brewhouse efficiency %. It was as easy as that. Since there is trub and wort left in the boil kettle after transfer to carboy, as well as wort in the chiller and hoses, that volume does not change between 5 gallon and 10 gallon batches. However as a percentage, against a 5 gallon batch it is a higher percentage. With that said, that reduces the overall percentage of efficiency the entire brewhouse is getting.
So what is the point of all of this? The goal is if you have a good understanding of these numbers, you can more effectively use these software tools. This will allow for more consistent brews and hitting your target numbers. Well fact is if you brew the same recipe over and over, you would iron out the recipe over time to become consistent. However if you are bouncing around a lot doing different recipes as I have been lately, then understanding efficiency is important because the only constant is the equipment.
I am probably not done learning this dynamic. I'm sure there are many other aspects to fully understand, but I at least feel like I've learned and figured out something pretty big.
Subscribe to:
Posts (Atom)