Monday, August 27, 2012

Batch #2 - Dogfish Head 60 Minute IPA Clone

After some discussion, we decided to do the exact same brew again.  First off I was anxious to do another brew!  The system was calling!  The whole week I reflected on our brew from the last weekend, and realized we may have made a major mistake.

Though we were careful to sanitize everything that would come in contact with the beer, I realized we may not have sanitized the outside of the hose that comes out of the chiller into the fermentor.  Doh!

In doing the same batch again, we felt we would have one of two results:
  1. If the first batch was good and no contamination, then this second batch would demonstrate how much better the rig was performing with us tightening things down.
  2. IF the first batch ended up being bad, then we have an IPA just a week behind it and it would help reduce the sting of such a mistake.
The brew day started at 10am, and I was running solo today as Sam had to go down to Indy.  I started by filling the HLT, removing the chlorine, and bringing up the temp.  While that was going on I started crushing the grain.

First problem of the day - I thought I had 28lbs of the 2-row, turns out I had 27.  Off to the store I went!

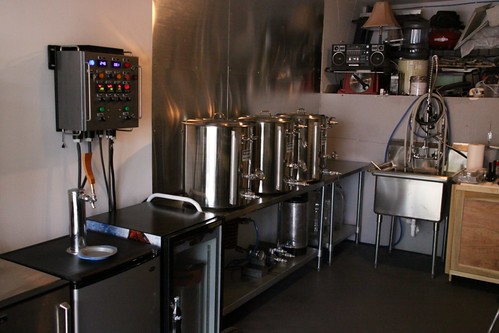
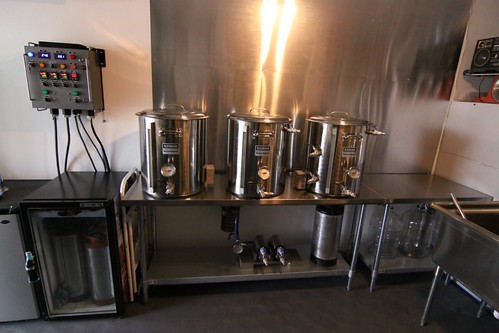
Once I had all the grains, I completed the crush, then started moving water into the MLT.  The connections were much better today, little to no leaking.  I felt this would help with better heat exchange as well.  The performance was better than last time, however it does seem to take ages to get that last 1-2 degrees in the MLT.

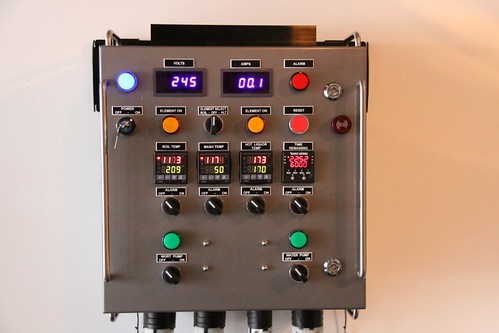
Second problem of the day - The PID on the HLT was overshooting the temp setting.  There is a way to calibrate them, so next time I brew I am going to do so.

I then put in the grains, stirred, added brewers salts, took Ph readings, and brought it down to 5.2-5.3.  Set the timer for 90 minutes and there we go!

Third problem of the day - The Wort pump started making a clicking sound.  I could not hunt it down, and it persisted the entire brew.  However its intensity lessened over time.  The flow seemed ok on everything so I didn't sweat it much, more annoying right now.

After the mash I started the mash-out in bringing the temp of the MLT up.  At this same time I started to adjust the Ph of the HLT for the sparge process.

Fourth problem of the day - I ended up putting in too much lactic acid!  My Ph went down to 4.2!  My target was 5.6-5.8, so I missed that by a mile.  Eventually I removed a lot of the water, and added new tap water and removed the chlorine.  This presented a problem though with the heat exchange in the HERMS, so it slowed my mash-out quote a bit.  I was able to get proper Ph though before sparge.

I then started to sparge, and things were looking good!  Once I had the level I needed in the boil kettle we were off and running.  This recipe has a lot of adding hops, so I spent most of the boil standing near the kettle tossing in hops.

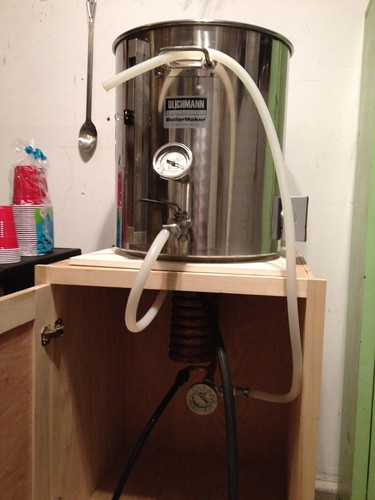
After the boil was complete I hooked up everything to chill the wort.

Fifth problem of the day - I connected everything and opened all hoses.  Then I started the cold water flow to chill, however I was getting leaks in several places.  One was due to simply not being tight enough, another the steel band wasn't tight enough around the barb, and the last was due to the rubber washer being in the wrong place.  While fixing all of those I didn't realize that my boil kettle was draining into my fermentor!  This now meant I had about 2 gallons not very chilled.

Sixth problem of the day - Once I got the chiller dialed in for good temp, the flow started to slow significantly towards the end.  Looking closely at the hose coming from the boil kettle I could see lots of air getting into the line.  This had me stumped as everything looked submerged still.  After later posting this experience on a forum, it was pointed out to me that the Hop Stopper I used will suck in air towards the end once any part of it goes above liquid line.  Because hops now line the outside of the Stopper, it slows flow down.  The solution is to slow the pumps to a crawl to keep siphon pressure in the line.

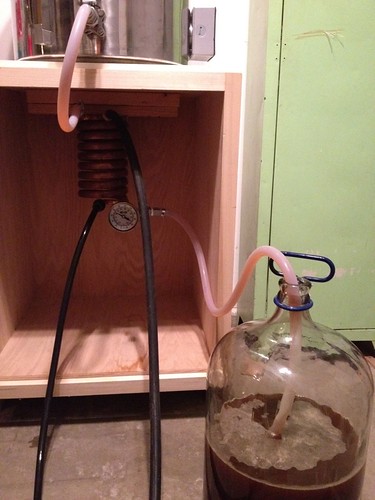
I ended up getting frustrated and left about one gallon behind that I didn't mean to, so I'm only fermenting about 9 gallons.  Our OG on this batch was 1.069.

Their ended up being one ingredient change from the first go around, unfortunately my local brew supply shop ran out of the Pacific Ale yeast by White Lab, so I substituted the Wyeast American Ale II yeast.

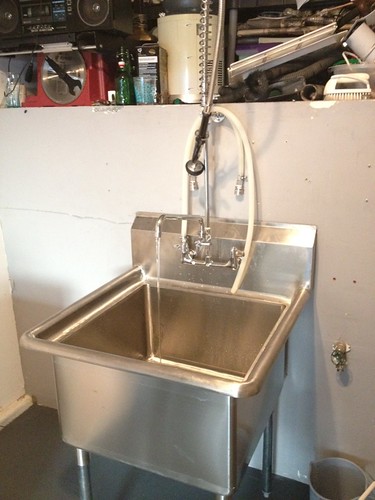
Since I had filled a carboy with about 2 gallons of hot wort, I had to let that cool before I could pitch the yeast.  I ended up putting that in the sink and putting the stopper in the bottom to let it set in a cool bath while the other carboy was filling up.  Afterwards I then let it sit in the colder basement for about 2 more hours before pitching the yeast before bed.

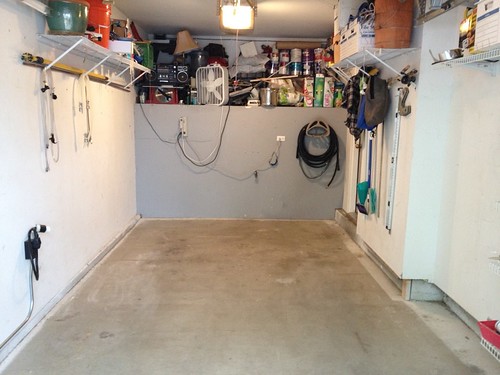
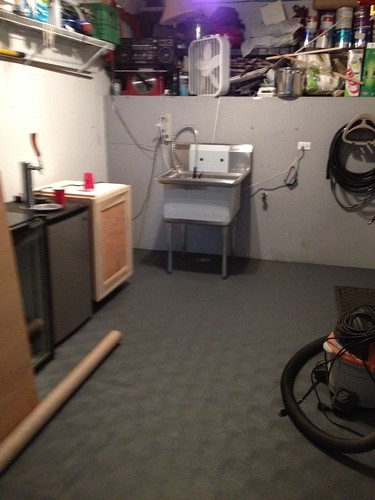
Once I had everything transferred, it was clean-up time!  That does take a long time when it is just one person.  The HLT of course is super easy to clean, as basically there is nothing to clean since it only holds water!  The MLT has almost 30lbs of grain in it, so there is a lot to clean there.  Fortunately it is the only kettle without a heating element so it is easy to bring into the sink for cleanup.  The boil kettle is a bit trickier to clean as it is the furthest from the sink, and there are a ton of spent hops in it that will clog the sink.  I've been using a strainer in the sink to separate the hops, it helps but it is still a slow process.

After the kettles are clean, the pumps and the chiller also need cleaning as well as the hoses.  I then put hot water back in the HLT, and run it through the whole system, then at the end of the line I drain it into the sink.

Whew, what a long day of brewing, but so much fun!  In the next few brews we will start adding parts to the brew day as well such as transferring from primaries to secondaries, as well as kegging.

Sunday, August 26, 2012

Tighting Down the Rig


After our first brew session we reviewed what needed to be addressed on the rig so our next would be even better.  In general there were more things dripping than we would like to have seen.  Some of which were easily addressed by tightening down fittings, others had to be completely removed and taped again with Teflon, then tightened back down.  The other drips were coming from the disconnects themselves.

We are using quick disconnects on our system.  They basically look like this:
Product Photo
Inside these disconnects are o-rings that can cause a leak if they are damaged or simply old.  I went ahead and ordered about 10 replacements o-rings to ensure no issues.  They arrived on Wednesday, so we decided to do a hot water run of the entire system to test out.  We knocked out basically every leak but one, looks like one of the male quick disconnects is problematic that will need to be replaced as well.  For now we moved that to the HLT input as only water goes through there.

This also gave us an opportunity to clean everything out with a deep clean, another process to get familiar with.  We use PBW cleaning solution to clean the kettles.  We let them set in each kettle for 30 minutes, and cycled it through our pumps and wort chiller.  Afterwards we rinsed everything completely.

Part of the reason we did this too is we saw what we felt was machine oil on the HERMS coil.  We thought this deep clean would clean that off, however we realized the solution did not take off that stuff, so we went at it with paper towels.

After cleaning everything we spent the rest of the evening bottling up the remaining Not So Banana Ale, or NSBA for short, to free up a keg.  There were probably only 12 bottles worth left.  Once the keg was free, we sanitized our two open kegs and then kegged our Saison.

In tasting the Saison, the first one we tasted did not taste that good.  It had a slight soapy taste to it, and a very bitter bite at the end.  That batch was using a White Labs Saison yeast that we fermented at around 76 degrees.  In later researching we thing we either let it stay in primary too long, keeping it in contact with its sediment.  Or possibly the temp was too high, however that yeast strain should be ok there.  The other tank which used a Belgian White yeast strain tasted better, but a little too sweet maybe.

We shot both kegs up with CO2 to carbonate, however we only put one in the fridge, and left the off taste one at room temp for a while in hopes it would settle down.  The one in the fridge should have enough carbonation by next weekend to drink.

We still have a keg of British Brown Ale that we need to bottle half of for our friends Rose and Joe.

It was a full night testing, cleaning, bottling, and kegging, but we are ready to go!

Batch #1 - Dogfish Head 60 Minute IPA Clone

On Saturday, August 18, 2012 we broke in the new brewery with a Dogfish Head 60 Min IPA clone recipe I found online at the Homebrewtalk.com forum.  Here is the link for those interested:

http://www.homebrewtalk.com/f69/dogfish-head-60-minute-clone-ag-extract-25709/

The recipe looked like this:
  • 28 lbs - 2 Row Pale Malt
  • 12 oz - Carapils
  • 6 oz - Crystal Malt 60L
  • Hops
    • 1.5 oz Warrior
    • 1 oz Amarillo Gold
    • 1 oz Simco
    • 1 oz Simcoe (later for dry hopping)
    • 2 oz Amarillo Gold (later for dry hopping)
  • Yeasts
    • 2 Packets - Pacific Ale Yeast - White Labs 0041
    • 2 Packets - American Ale Yeast - 1056
  • Additives
    • 2 Whirfloc Tablets
    • 2 Grams Calcium Carbonate (Chalk)
    • 3 Grams Calcium Sulfate (Gypsum)
    • 2 Grams NaCl (Kosher Salt)
    • Potassium Metabisulphite
Being the Project Managers that Sam and I are, we worked out a step-by-step process we followed for our first brews to ensure we were not doing anything out of order.  This will probably be the only time I go into a bit of the step-by-step process, going forward will mostly just review what we brewed and results.

The process started by heating the water in the HLT (Hot Liquor Tank).  We filled that up to 20 gallons and then heated it up to 154 degrees.  While the water was heating we crushed our grains in our Barley Crusher grain mill.


Our first lesson came during the crush, which is to always make sure the cordless drill is fully charged!  Ended up having to use the hand crank for a bit of it.

Once the water was up to temperature we transferred hot water from the HLT to the MLT (Mash/Lauter Tun).  For this recipe we used 9.6 gallons.  This is calculated via a straight forward equation:

Strike water = (Mash Thickness X Pounds of Grain / 4) + liquid in hoses 
courtesy from Kal from www.theelectricbrewery.com

We were going for a Mash thickness of 1.25, so the equation looked like:

Strike Water = (1.25 x 29.125/4) + .5 = 9.6

After transferring this water, it needed to be heated a little and brought back up to temperature as it lost a little heat during the transfer process.  This only took maybe 10 minutes.  After it was up to temperature we slowly started scooping the grain into the MLT until it was all in.  During this process we were mixing it the whole time to ensure no dry clumps and a well mixed mash.

At this point we introduced our Brewers Salts (Chalk, Gypsum, Salt), stirred well, then took a Ph reading.  Our target Ph level is 5.2-5.3, we were coming in at 5.7 at this point.  To decrease that level we need to introduce an acid, and most brewers will use Lactic Acid at 88% concentration.  Very little is needed, we only added 4ml to the entire batch to bring down to 5.3.

Once we had all of our levels good, we started our Mash process for the next 90 minutes*

*Lesson 2, the timer needed to be programmed to reflect min:sec, it defaults to seconds.  We entered 9000 thinking it was set for 90 min and 0 second, but it was 9000 seconds.  We ended up with a 2.5 hour mash!  Fortunately I don't think it hurt much, mostly my pride.

The next phase is to Mash Out.  This is done by bringing the HLT up to Sparge temperature, which will bring the MLT up as well through the HERMS system.  Once up to temperature we reconfigure the hoses and then start moving the liquid out from the bottom of the MLT over to the Boil Kettle.  Since we only had 9.6 gallons in the MLT, we then start moving more water out of the HLT over to the MLT to compensate.

This process is called Sparging.  It is taking the new water from the HLT and feeding it onto the top of the grain bed in the MLT to basically rinse out the last of the sugars.  I should also mention before we started moving that water, we did a Ph reading on the HLT and introduced Lactic Acid to bring it down to a level of 5.8.

During this stage we realized the rig was still being dialed in.  We didn't feel the heat exchange was as good as it should be between the MLT and the HLT through the HERMS system.  We took note of this to address between brews later.

This Sparge process lasts about an hour, and what you are left with is sweet wort in the Boil Kettle.  We then bring that up to a boil, and start to add our hops.  As this is an IPA there are a lot of hops involved.  This particular recipe called for a continuous hopping during the entire boil where we start by slowly introducing Warrior hops, then at 25 minutes in we start introducing the Amarillo Gold hops, then for the last 30 minutes we slowly introduce the Simcoe hops.  We do this for the entire 60 minute boil where ideally we are putting in the last hops at the end of the boil.

15 minutes before the end of the boil we introduce the whirflock tablets, however we lost track of time a bit and put it in closer the 8 minutes remaining.  This is used as a clarifying agent to help us achieve a nice clean looking beer.

Once the boil is complete we run out of the Boil Kettle and through our wort chiller to bring the wort down to 72 degrees.  This will allow us to pitch the year right away.  However first we take the full fermentors and introduct oxygen for the yeast.  We have a small tank with an air stone that helps disperse the Oxygen, we run that for about 2.5 minutes.

Lastly we label our fermentors as we used the Wyeast in one of the carboys, and the White Labs yeast in the other.  We then pitch the yeast into the wort, then go and set it all someplace nice and dark and cool.

These yeasts want to be around 65-68 degrees, so I put the fermentors in our utility room which has a concrete floor in it, and is located next to the AC handler which makes the room a little colder.  Last check the room was at 65 degrees (rest of the house not near that cold).

We will ferment this for 2 weeks, then move to a secondary fermentor, at which time we will add our dry hops to the worts.  We will let that site for another week and we will keg that beer.  After about a week in the keg with CO2 plugged in, it will carbonate itself.  It would be good to drink then, but it does get better over a little bit of time to let the beer mature and smooth out a bit.

After we complete some next phases I will take some photos and post them.  Cheers!

Building Relativity Brewery

Here is the birth of our brewery! - by Jeremy

When we started this effort, I knew we had a few things to test out first, the biggest being brewing in the garage. Up to this point I was an extract brewer in my kitchen, so I wasn't sure what challenges we would have in the garage. I first pulled the trigger on purchasing only the boil kettle, and building the boil portion out and doing extract brews.


Here our cat Maggie was checking out the new addition.

As you can then see below the garage was in need of a lot of work.  I do have the boil kettle in here on top of a cabinet on the left. Things were pretty cluttered, and needed a gamplan to get turned into a place to brew.


After getting the boil pot built, and running a 30amp 240 volt power supply, we started doing extract brews.  We would simply plug the Boil Kettle directly into the outlet we ran for the brewery. We would lose a lot of brew through evaporation as the heating element was on the entire boil (later a temp controller would control this part), but it worked for our purposes. All-in-all we did about 4 extract brews with just this while I was ordering and building the rest of the rig.


The batches we did were:
  • Banana Ale (later renamed Not-So-Banana Ale for the lack of banana flavor)
  • Firecracker Ale  - Made for the 4th of July, had Red Hots candy put in during the boil for a little zip and red color.
  • British Brown Ale
  • Saison
Those were just a couple of pics from an extract brew day. We learned a lot from doing this. First, a sink was going to be a game changer and we needed one. Second, we spill a little from time to time, so a protective flooring will making cleaning easier. Third, it might not be a bad idea to put up some sort of backsplash to protect the wall from the steam (a vent will help as well, but that is going to come later).

Here I cleared the garage getting ready for the new floor.


Here is an after picture once the new floor was installed, which was just in time as the next day the plumber was scheduled to install the new sink.


The sink after the plumber finished his work.


Next for the garage we put up some 3'x3' Aluminum panels we got from Home Depot to make a backsplash.  This would cover everything behind the brew stand.


Finally, the new Stainless Steel tables arrived. I threw a couple of pots on for a quick pic to get a feel for the new rig.  At this stage we still had the control panel to complete, pumps to mount, counter-flow wort chiller to mount, lots of work on the kettles directly in adding valves, etc...  However it looks like a brewery here!


The focus then moved to building the control panel.

I bought all of the parts from Spike Innovations to put together myself. For a while I thought I would get the holes cut in the control panel via waterjet, but I had trouble getting a reasonable price from a place here in town so I decided to just cut them myself.


After the holes were complete, I did a quick dry fit to see how everything looked in place.


Next step was painting, then starting the wiring.


Finally the wiring is complete!


It's alive!


Here is the garage with everything mounted, and system working.  For our first batch we brewed a Dogfish Head 60 Minute IPA clone recipe I found.  More on that to come!


Loving the new system, you'll have to stop by for a beer sometime!

Welome to Relativity Brewery!

Welcome to the new home site for Relativity Brewery!  This is where we will capture the birth, and growth of our new brewery.  We are in our infancy, and like an infant we have a lot to learn.  As they say though, it is about the journey, not the destination.  We are ready for a fun and wild ride!

Who we are
My name is Jeremy, and my Brother-in-Law Sam and I will be working through plenty of ideas and recipes to come up with some great brews.  We of course are also well supported by our loving wives, without them none of this would be possible.

What we are starting with
We recently completed the build of our new electric brew system.  We built this from the plans Kal has posted online at www.theelectricbrewery.com.  If you have not checked them out, you should!  Our goal was to build a system on par with most pilot systems.  These systems allow solid control over each step of the brew day process.  This will allow us to repeat recipes with greater consistency.

What are we going to brew
Who knows!  Since neither of us have gone to brewing school, this means a lot of self-study, and more importantly practice.  We read through all the regular forums, and have ready the must reads for most home brewers.  There is still a lot for us to learn though.  Point being there is going to be some wandering in this process while we figure out what we like, and how to distinguish ourselves.  Our goal will be to find a core group of recipes that make a regular rotation that we feel are fine tuned.  If we are able to put 3-4 of these together, who knows maybe we will try to take this up a notch and try to get it in some restaurants here in town!

Feedback welcome
Should this site actually get read by more people than just our immediate family members, we welcome feedback!  We will post the recipes we try, our observations, and even tasting notes.  Basically we are looking to capture the entire experience of brewing, and share that with others.  We are firm believers that the best ideas are not born out of a vacuum, creativity is sparked by networking.

Thanks for taking a look at our site!